Tutorial: Querx Hub
Querx Hub is a free tool for PC that scans the local network for egnite network sensors. The device merely needs to be physically connected to the network via an ethernet cable, in order to be found. It does not need to be configured with a valid IP.
The located devices can, for instance, be displayed in a list including the current sensor readings, which are updated once per second. Additionally, the configurations for multiple devices can be saved simultaneously or their firmware can be updated.
The application is available for Windows 7 through 10, Linux and macOS. An image for the Raspberry Pi is now also available.
This tutorial explains the most important functions of Querx Hub and provides helpful tips for its operation. It is based on Querx Hub version 2.0, which was released in August 2020.
History
Querx Hub is based on the application Device Discoverer, which is provided for free by egnite and is used with almost all of the manufacturer’s network enabled devices.
Device Discoverer, however, is only used to display and modify the network configuration, whereas Querx Hub also accesses the device’s web interface, in order to read other parameters, such as sensor values, or update the firmware.
Installation
The install file required for your operating system is available in the support area of https://www.egnite.de under Downloads.
Installation on Windows
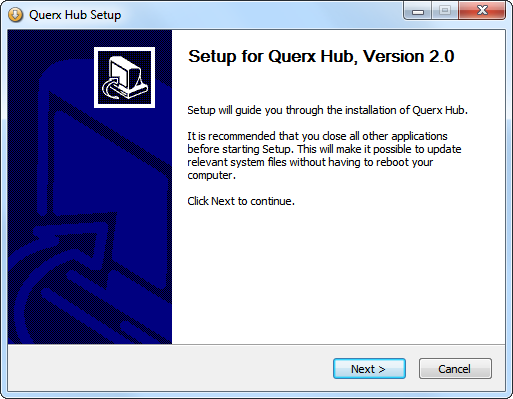
Execute the install file. The first step will be selecting the language in which the installation program will be run.
Click the button Next in the following window.
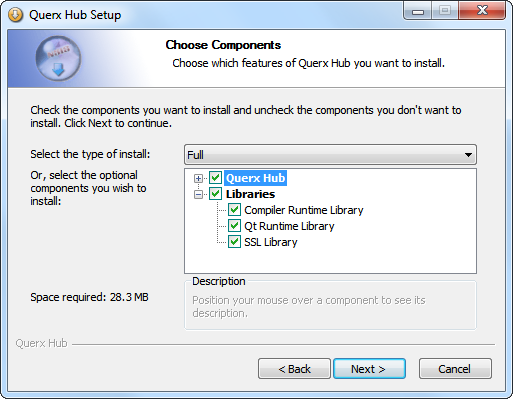
In the next window you can select which components to install. Click Next.
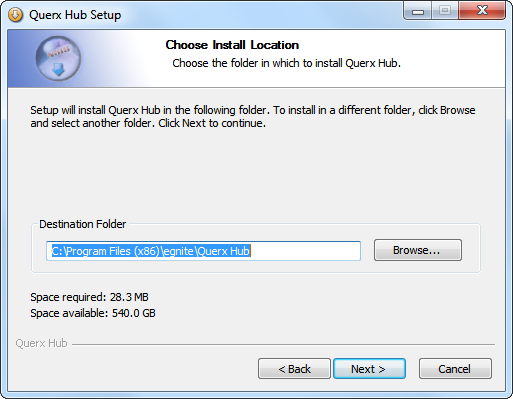
You can now select the directory in which the application will be installed. Click Next here, too.
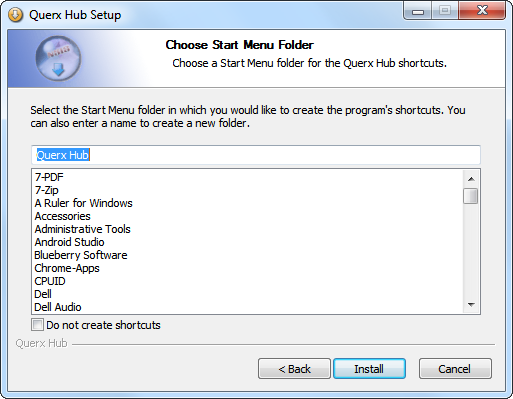
The next step allows for the configuration of the entry in the start menu. Click Install to begin the installation.
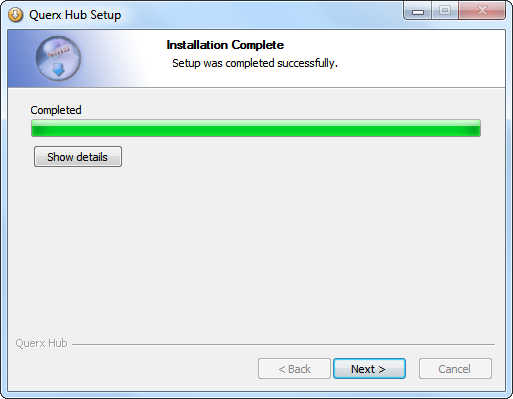
Click Next after the installation is completed.
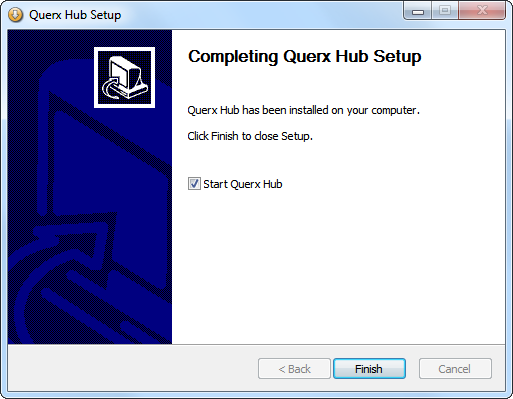
Querx Hub will be run after you click Finish in the last window.
Depending on the configuration of your firewall, a warning may appear after starting the application. Querx Hub requires a UDP server port, in order to receive data from Querx devices. Therefore it is necessary to allow the corresponding access.

Installation on Linux
Two different variants are available for Linux: A Debian package and an AppImage.
The package querxhub_1.3-1_amd64.deb can be used for Debian, Ubuntu and similar distributions. The package can be installed by opening it and hitting the Install button under some distributions. In any other case, the following command can be executed as root:
dpkg -i querxhub_1.3-1_amd64.deb
The AppImage can also be used with other distributions and does not need to be installed. After downloading the file, it needs to be made executable. You can either use the file manager, or execute the following command:
chmod +x QuerxHub-1.3-x86_64.AppImage
Now the AppImage can be run. See also https://docs.appimage.org/user-guide/run-appimages.html
Should you be running a firewall, UDP port 9806 needs to be opened, so that the devices can be found.
Installation on MacOS
Open the Apple Disk Image (file extension .dmg) and copy the application QuerxHub.app to the required directory. Run the app by double clicking it.
Installation on the Raspberry Pi
Extract the zip archive onto an SD card that is formatted with FAT32. Insert the SD card into the corresponding slot on the Raspberry Pi. Connect the Raspberry Pi to the network and a display. A mouse and/or keyboard are also required to configure the device. Finally, power up the Raspberry Pi.
The main window
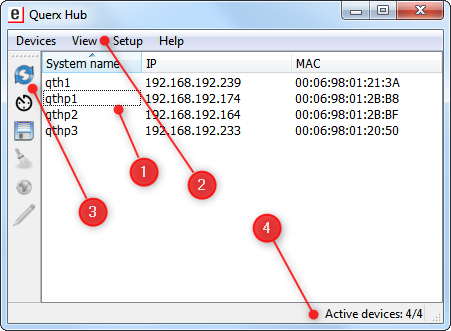
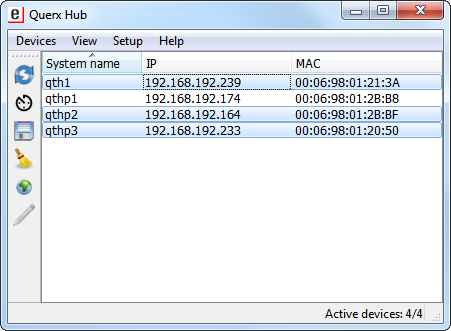
After starting the application, the network will be searched. All found devices are displayed in a list 1. The menu bar 2 is displayed above this. Its various functions will be described in the following. Functions that are used frequently are also displayed in a toolbar on the left side 3. A status bar 4 is located at the lower edge of the window, displaying additional information.
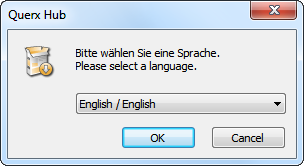
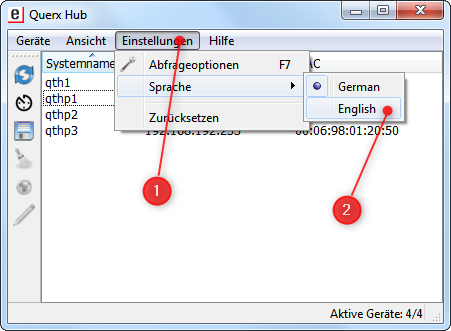
The application will try to detect the language the computer is set to. If it does not manage to do so, it will use English as the standard language setting. Should it be set to German, click Einstellungen 1 in the menu bar, navigate to the tab Sprache and select English 2, in order to configure the language.
Network query
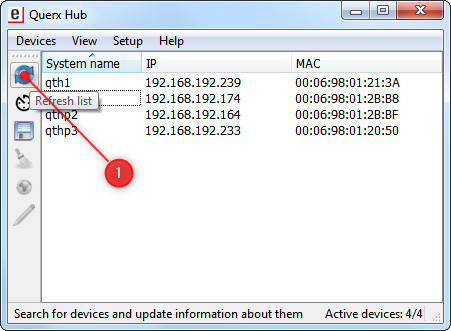
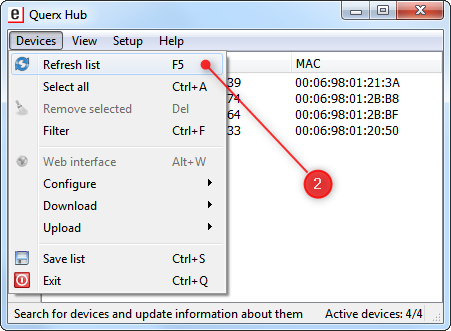
When the application is executed, it sends a query (UDP broadcast) to all devices that have registered. Every device that answers Querx Hub’s query will be displayed in the list. Clicking ![]() in the toolbar 1 sends a new request to the devices and the list is updated.
in the toolbar 1 sends a new request to the devices and the list is updated.
This function can alternatively also be accessed via the menu 2 or by hitting the F5 key.
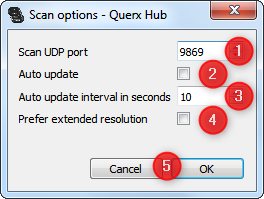
The interval at which the data is updated and several other options can be adjusted via the menu Setup 4 or the F7 key.

This opens a window with the following input options:
- Scan UDP port: The port via which data is retrieved. This can be individually adjusted for each device via the web interface. Further information will be given in the following section.
- Auto update: The automatic repetition of data retrieval can be activated or deactivated.
- Auto update interval in seconds: The standard settings update the data every 10 seconds and can be customized here.
- Prefer extended resolution: The current firmware version can increase the data’s resolution by a decimal point. If older firmware versions are used, this option has no function. Please note that the accuracy detailed in the respective sensor’s data sheet still applies. One of the later chapters goes into further detail on the data that can be displayed.
Confirm your settings by clicking OK or revoke them by clicking Cancel 5.
As previously described, the port that is used for network queries can be changed. Querx Hub only shows devices that use the same port. In order to change the port a certain device uses, please open its web interface. The relevant settings are located in the Network section of the System area. Further information can be found in the device’s manual.
The devices in more extensive setups can thus be split into groups by allocating an individual port to each group.
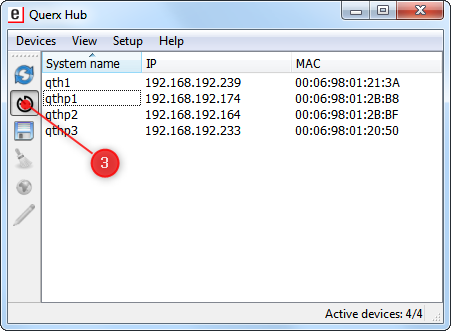
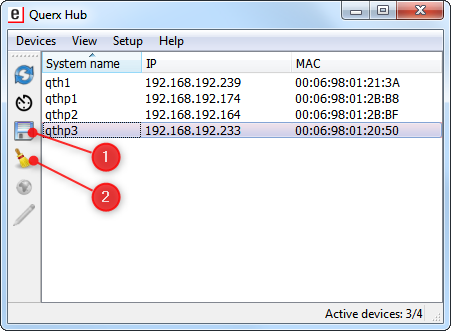
Should a device that is already registered in the list 1 no longer respond when the data is updated, the corresponding entry will initially be highlighted yellow 2. If further requests also fail, it will be highlighted red 3. Thus, the list of active devices is updated in the status bar 4. Activate the automatic update 5, in order to continually monitor the availability.
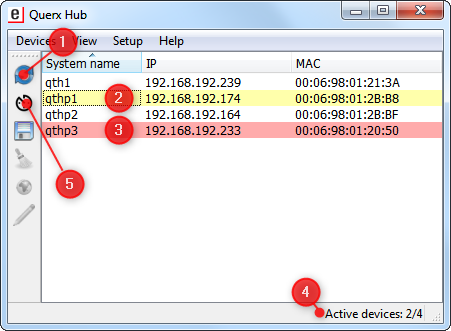
After restarting the application, the list is initially empty and is only filled once the devices respond to queries. This will usually happen within a fraction of a second. If the application is restarted after a device has failed, it will no longer appear in the list.
The current list can be saved 1 by clicking ![]() , making it easy to identify devices that have lost contact, even after restarting the application.
, making it easy to identify devices that have lost contact, even after restarting the application.
If a device is no longer in use, you will probably want to remove it from the saved list. Select the device and click ![]() , in order to remove it from the list 2. Once the device is removed, the updated list can be saved 1.
, in order to remove it from the list 2. Once the device is removed, the updated list can be saved 1.
Network configuration
The users on a local area network are only available if the network configuration (IP address, network mask, etc. ) corresponds with the network. In its standard settings, Querx is automatically configured 1. It is, however, also possible to configure the network settings manually. When using a manual configuration, it may happen that the settings no longer work if the network is changed. Querx Hub will detect such devices, but it can not retrieve any data from them 2.
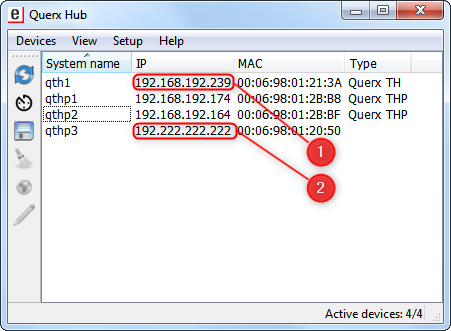
The faulty network configuration can be corrected in Querx Hub. Select the respective device 1. Click the ![]() icon in the toolbar, in order to adjust the settings for the selected device 2.
icon in the toolbar, in order to adjust the settings for the selected device 2.

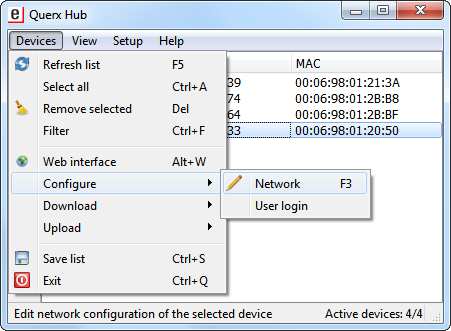
You can alternatively access this function via the menu or by pressing the F3 key.
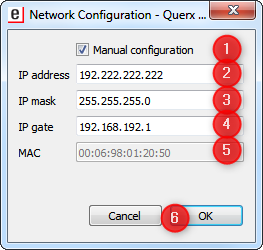
A window that lets you make the following changes will open:
- Activate or deactivate the automatic network configuration via DCHP. All other settings can only be changed if the manual configuration is activated.
- Allocate a static IP address to the device.
- Enter the IP mask for the network.
- The gateway’s IP address is required in order to establish a connection to the internet. This is necessary for the device to send emails or transmit data to a cloud service.
- The device’s MAC address is merely displayed and can not be changed. If 02:00:00:00:00:0 is displayed, this indicates that the device has lost its standard configuration. Should this occur, please contact the manufacturer.
If necessary, please coordinate the settings with your network administrator. Confirm your settings by clicking OK or revoke them by clicking Cancel 6.
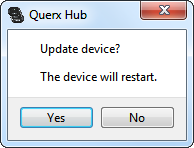
After clicking OK, a security prompt will appear. If you confirm by clicking Yes, the device will be rebooted, using the new configuration.
Sensor display
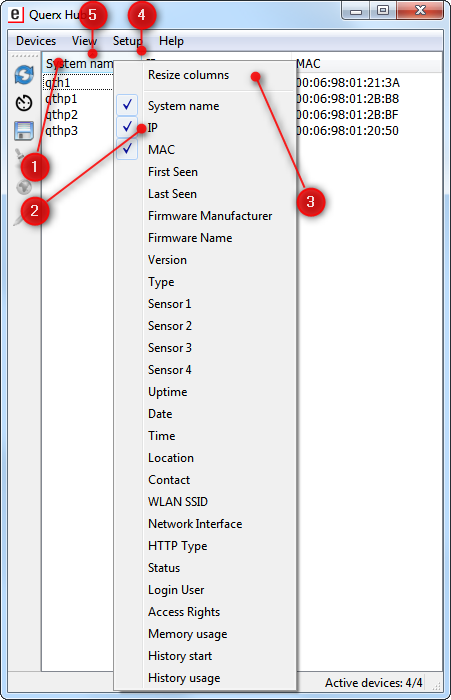
The list of connected devices contains multiple columns of data. You can select these columns from a list of available information. Use the right mouse button to click the header of the list 1 and select the information you want to add or remove 2. The currently selected columns are highlighted by a checkmark.
The width of each column is initially set automatically. Additional information may, however, require more space. If you click the first entry Resize columns 3, the app can automatically resize the columns to fit the currently selected data columns. Additionally, you can also manually resize the columns by dragging the dividing lines 4 with the cursor.
The order of the columns can also be changed by dragging their titles 5. Clicking the titles sorts the corresponding data in ascending order. A further click reverses the order.
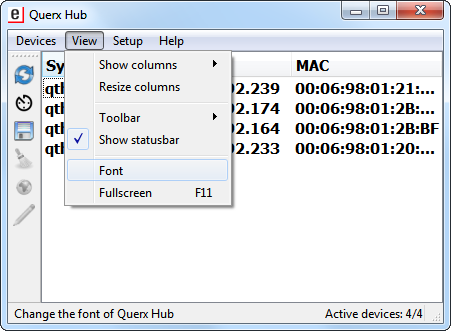
In some cases it may be required to view data from afar. The font and size can be configured in the menu View.
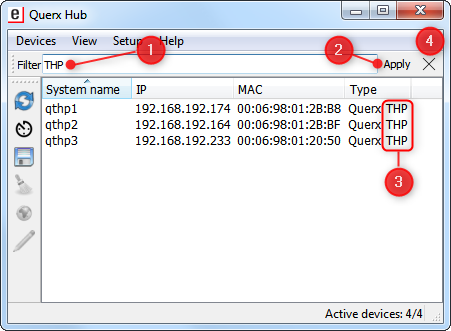
If a lot of devices are installed on the network, you may not want to display the data for all of them. As described in the chapter on network queries, the devices can be grouped by assigning individual ports to each group. Alternatively, the list can also be filtered by key words by activating the filter in the menu Devices.

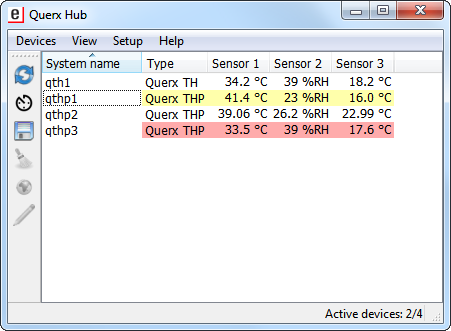
If a character string 1 is entered as the filter, only devices that include the string will be displayed after clicking Apply 2. The example in the screenshot only displays Querx THP devices, as the filter for the Type column is set to THP 3.
Clicking the X at the right 4 deactivates the filter.
While Querx Hub can display current data, it is not meant to display logged information. In order to view this data, the web interface for the respective device needs to be accessed, which can be done via Querx Hub.
Select the device in the list 1 and click Web interface 2 in the menu Devices or click the corresponding symbol 3 in the toolbar. Alternatively, you can also use the shortcut Alt+W, or simply double click the device in the list 1.
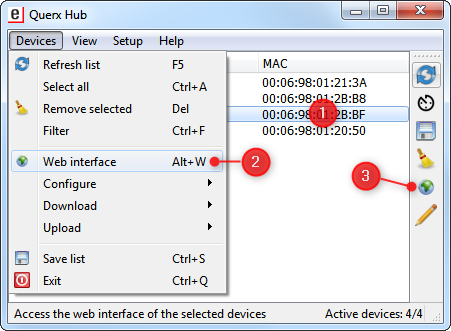
If Querx Hub detects a device on the network but can not receive any data from the sensor, the columns displaying the data that could not be retrieved are initially highlighted yellow and then red. This is usually the data that Querx Hub gathers via the web interface.There are multiple reasons why this may fail.
One possibility is that the web interface is not accessible via the standard port, 80 for HTTP and 443 for HTTPS. Querx Hub does not currently offer a solution for this.
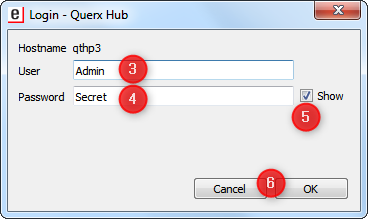
It may, however, also be that the web interface requires a login. This is supported by Querx Hub. Select the respective device 1 and click User login 2 in the drop down menu Configure section of the Devices menu.
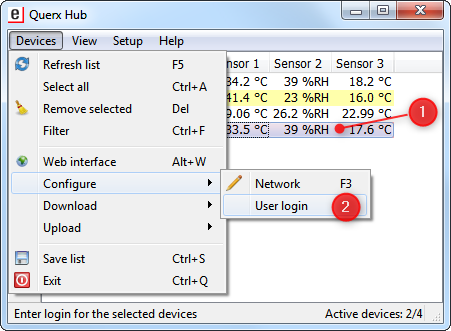
A window that lets you enter the user name 3 and password 4 opens. The latter is concealed, but can also be shown 5, in order to check it. Finally, click OK to confirm your settings or Cancel to revoke them 6.
Backing up and restoring the configuration
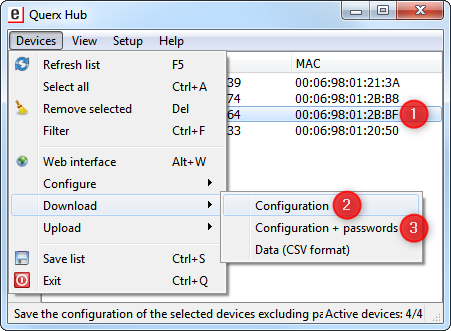
Any device’s configuration can be transferred to the computer and saved in a file. Firstly, select the device 1 whose configuration you want to save.
The configuration is saved as a text file and can be viewed with any text editor. You can therefore select whether it does 2 or does not 3 include the passwords. If you select the latter, the passwords for email accounts, WiFi keys and user passwords may be saved on your computer without any encryption. You should take precautions to protect these backup files from unauthorized access. If the configuration is saved without the passwords, this login data will need to be manually entered after the configuration has been restored at a later date.
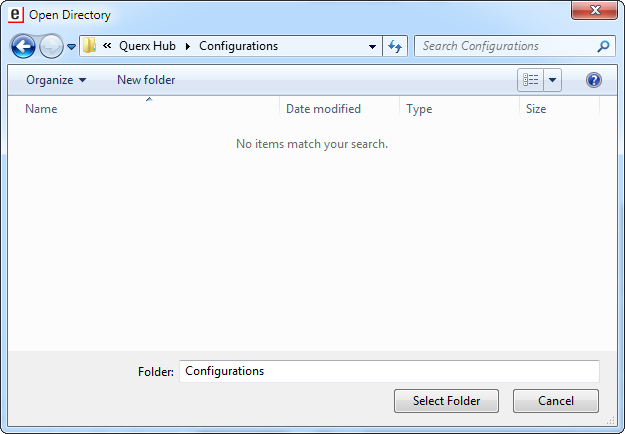
Select the directory in which the backup file will be saved.
The file’s name is generated automatically from the device’s name and MAC address, followed by the date and time (world time) of the backup, divided by hyphens. The file extension of the backup is qini.
After selecting the directory, a window displaying the current status will open. The transfer usually takes less than a second and the status Finished 1 is displayed. Click Close 2 to finish backing up the configuration.

If you need to restore a configuration, select the device 1 and then click Configuration 2 in the Upload section of the Devices menu.

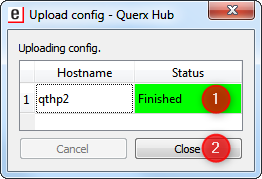
A window that lets you select the backup file 1 will open. Please make sure this is actually the required file. Transferring a wrong configuration can make it necessary to manually reset the device to its factory settings. The user manual provides instructions on how to do this. If you are sure that you have selected the correct file, click Open 2 to transfer the file to Querx.

After selecting the backup file, a window displaying the current status will open. Once the status is set to Finished 1, click Close 2 to complete restoring the configuration.
Changing certain parameters of the configuration will make it necessary for the device to reboot. This can either be done via the web interface or by briefly disconnecting the device from the power supply.
Updating the firmware
The Querx firmware is continuously improved upon. Current versions can be downloaded from the manufacturer’s web site for free.
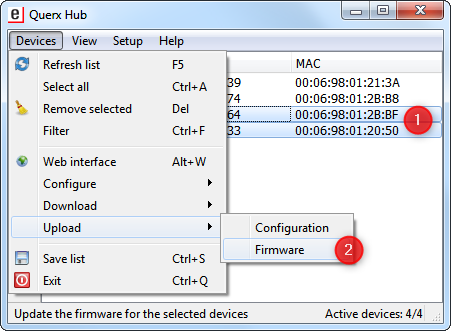
In order to update a device’s firmware, select it from the list 1 and then click the button Firmware 2 in the Upload section of the Devices menu.
The following chapter explains how to update the firmware for multiple devices at once.
A window from which you can select several options will open.
- Select the buffer. Querx features two firmware buffers. This offers the possibility of reverting to the old firmware, should an update fail. Additional information on this feature is available in the Querx user manual.
- Enter the complete path for the firmware file on your computer. If you used a standard browser to download it from the manufacturer’s website, it should be located in the download directory. Clicking Search will open a file selection dialog.
- Querx Hub reads the device’s current configuration before updating the firmware and reapplies it once it has been updated. If you select the option Save Config, Querx Hub will additionally save the configuration in a file in a directory that you can specify.
- Once you click Update, the firmware will be transferred and activated, including the backup and restoration of the configuration, if applicable.
- When the update is completed, you can exit the dialog by clicking Close. Clicking Cancel will terminate the process of updating.

Helpful tips
Applying operations to multiple devices
The possibility of applying operations to multiple devices simultaneously is particularly useful. For instance, this lets you update the firmware for several devices of the same type at once.
Instead of selecting a single device, simply select multiple devices before performing an action. Click the first device, so that it is highlighted. Now highlight additional devices by holding the Ctrl key while selecting them from the list. Release the Ctrl key and perform the required action.
Configuring multiple devices
In general, the configuration for multiple devices can also be restored simultaneously. However, if a regular backup file is used for this, all the devices would be given the same name and all the settings would also be the same. This is definitely not a good idea.
As previously mentioned, the configuration backup files are simple text files that can be created and edited with a text editor. If you open a file in any text editor of your choosing (e.g. Notepad on Windows), you will find a series of simple allocations, such as
sensortab_lim_lo.1=-40.0
or
sensortab_lim_hi.1=85.0
consisting of a variable and a value. Unfortunately, no list of the applicable variables is available as of now (August 2020), but viewing a previously saved configuration should reveal the meaning of most of them. The two variables cited above specify the lower (lo) and upper (hi) limits (lim) for the first (.1) sensor.
Create a new text file with the lines
sensortab_lim_lo.1=10.0
sensortab_lim_hi.1=35.0
and save it with the name sensorlimits.qini. Highlight all devices 1 in the Querx Hub list that you would like to apply these settings to and click Configuration 2 in the Upload section of the Devices menu.

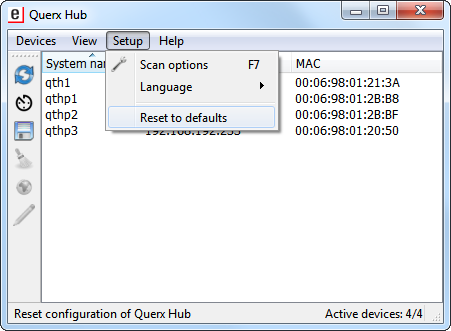
Restoring default settings
The settings that can be configured for Querx Hub are wide-ranging and changes are automatically saved. Thus, they remain intact after the application or computer is restarted. After some alterations, you may wish to restore the application’s default settings. Simply click the button Reset to defaults in the Setup menu.