Tutorial: Querx and Zabbix
The Querx network-thermometers can be integrated with the open-source monitoring-system Zabbix with the help of a provided template. The template defines items for temperature and humidity, a graph that displays both values together and the following triggers:
▪ Querx can not be reached
▪ Upper temperature threshold transgressed
▪ Lower temperature threshold transgressed
▪ Upper humidity threshold transgressed
▪ Lower humidity threshold transgressed
The predefined values correspond to the values suggested in this tutorial and can be adjusted to your specific needs. Various options for the display of alerts are available. In this tutorial we will be drawing on the triggers available in Zabbix.
For the sake of this tutorial, we chose to use Querx TH as the sensor we will install.
Installing the Template

Download the Zabbix template for Querx TH from the Zabbix community Wiki. Then open Zabbix as the admin, navigate to the menu point Configuration (1) and select Templates (2).

Now import the downloaded template by clicking Import in the top right corner.

Select the downloaded file and then click Import.

As long as no unexpected problems occur, Zabbix will confirm that the template has been imported successfully.
Creating a Host for Querx and Adjusting the Items

Create a host for Querx TH by navigating to the menu Configuration (1), selecting the section Hosts (2) and clicking Create host (3) in the top right corner.

A number of basic parameters need to be entered on the following page: A Host name for Zabbix (1), a Visible hostname for the system (2) and a host Group in which Querx is to be listed (3). If no suitable host group exists yet, you can create one. Since Querx and Zabbix communicate via SNMP, you will need to add a new SNMP interface and enter the IP address (4) at which Querx can be reached on the network. Then click Template (5), in order to assign the new host to the template that was imported in the previous step.

Click Link new template (1) to assign Template Querx TH (2) to the host. Then click Add (3) and finally, Save (4).
Checking the Host Settings

Now we need to make sure that the host has been successfully set up. Click the entry Latest Data in the menu Monitoring. Three items should now be displayed below the specified host name: System Name, Temperature and Humidity. This section lets you know when the respective items were last queried and what the returned value was. The default configuration updates the values every 30 seconds. If no data is visible, wait for this time period.
Adjusting Items
You may want to change the labels for the values or the rate at which the values are updated. Since these are already specified in the template, they will also need to be adjusted there. When accessing the items via the host configuration, the respective input fields can not be edited.

Navigate to the Configuration menu (1) and select the item Templates (2). Then click Items (3) under the entry Template Querx TH.

Here, the various items can be selected and edited. The above image shows an exemplary configuration for the temperature item with the SNMP OID 1.3.6.1.4.1.3444.1.14.1.2.1.5.1, the SNMP community public and an update interval of 30 seconds.
The most important SNMP OIDs for Querx TH
Temperature sensor
1.3.6.1.4.1.3444.1.14.1.2.1.5.1
Humidity sensor
1.3.6.1.4.1.3444.1.14.1.2.1.5.2
Calculated dew point
1.3.6.1.4.1.3444.1.14.1.2.1.5.3
The MIB for Querx TH can be downloaded from the device itself at http:///egnitephysensor.mib
Please ensure that the temperature unit that is selected here is the same as the unit you have configured on Querx TH. You should also note that the temperature sensor, unlike the humidity sensor, employs the Custom Multiplier 0.1. This is used to divide the transferred value by 10. Querx TH multiplies the temperature values by 10 internally, in order to avoid floating point operations.
Setting up a Test Alert and Adjusting the Triggers
In order to make sure that Querx TH and Zabbix work together fine, you should set up a test alert on the host level.

Navigate to the menu Configuration (1), select Hosts (2) and click Triggers (3) under the entry for Querx TH.
You will now see the five triggers defined in the template, preceded by the template’s name as well as the conditions that will set off the trigger. The conditions for the triggers that are configured via the template can not be edited on the host level. If you want to adjust the values, please define the triggers via Configuration / Template, as detailed in the final section of this tutorial.

Create a new trigger to set up the test trigger. Click the button Create trigger in the upper right corner.

Give the new trigger a Name (1), in our example we entered Querx TH Alarm Test.
Now click Add (2) next to the input field Expression, in order to add a condition for the trigger.

Click Select (1) next to the field Item in the window that will now open, to select the item that you want the trigger to monitor. Select the item Temperature (2). The trigger for this item is to be set off when the latest measurement transgresses a threshold specified by you. Select the entry Last (most recent) T value is > N (3) from the field Function and replace the placeholder N (4) with a threshold value that is below the current temperature. Then click Insert (5).
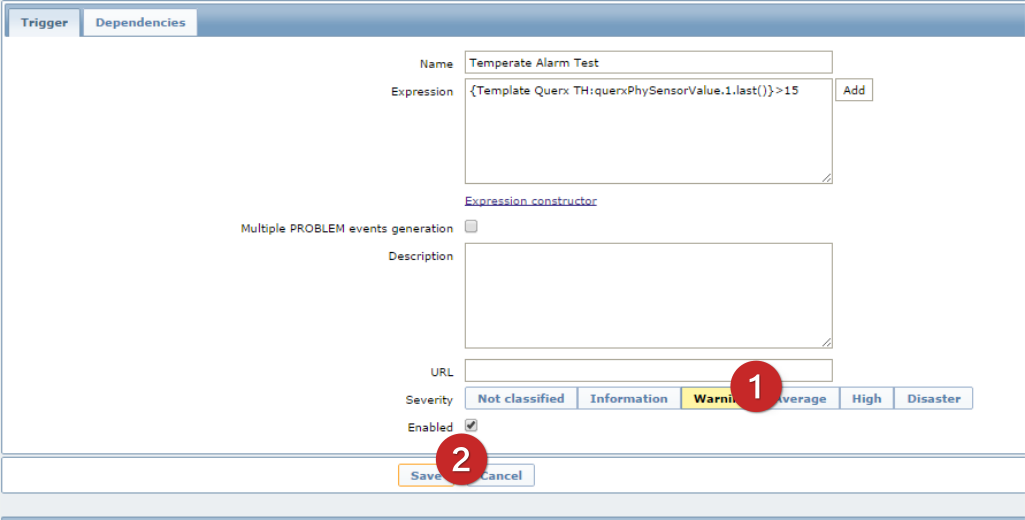
Allocate a severity level to the test alert. In this example we selected Warning (1). Finally, click Save (2), to save the trigger.
Checking the Test Alert

You will not yet see the triggered alert after navigating to Monitoring, due to the update rate. The alert should be displayed in the fields System status and Last 20 issues after 30 seconds.

You will see the trigger after navigating to Monitoring / Triggers.

Now deactivate the test alert by opening the overview of triggers in the host configuration and deactivating the test alert by clicking the entry Enabled.