Tutorial: Cloud Support
Transmitting data to cloud services.
Firmware version 4.2 introduced the HTTP-Push feature. This makes it possible to transmit data to other HTTP servers. Since this feature can also transfer data to the cloud services that had previously been supported (dweet.io, ThingSpeak), HTTP-Push replaces the old menu item Clouds.
This feature’s first implementation caused some issues. Therefore you should make sure to update your firmware to version 4.2.8 or later.
Two steps are necessary to begin sending data to a cloud service: The settings for HTTP-Push need to be configured and a template that specifies the data format needs to be installed.
The following description addresses the details that allow a web developer to create templates for any cloud service, as long as the service can receive data via HTTP. If data is to be sent to dweet.io or ThingSpeak, it will suffice to read the respective sections.
Sending Data to dweet.io
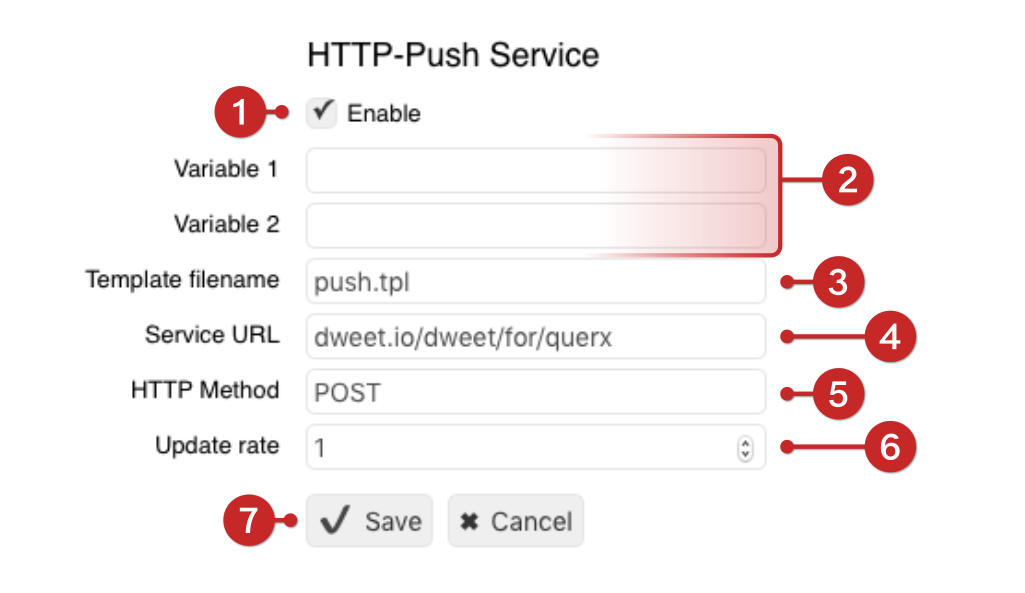
The standard template push.tpl that is already included in the firmware that Querx ships with, can be used to send data to the cloud service dweet.io. Therefore, the only step that is required is to configure the HTTP-Push feature. Open the page Interfaces/HTTP Push in the Querx configuration area.
- Activate data transfer by clicking the button Enable.
- The input fields Variable 1 and Variable 2 can remain empty.
- Enter push.tpl into the input field Template filename.
- Enter the URL for your dweet.io channel into the field Service URL. In this example, “querx” is a placeholder that needs to be replaced by your channel’s name.
- Enter POST into the input field HTTP Method.
- The Update rate needs to be specified (in minutes). If the value is set to zero, a dataset is transmitted whenever any data has changed.
- Click Save, in order to save your settings and begin transmitting data.
Creating Templates
Other cloud services such as ThingSpeak require specific templates. Such templates can be found in the support section on sensors.egnite.de. The templates can, however, also be created with a text editor (e.g. Notepad).
Templates usually consist of static texts and place holders for dynamic data, so-called web-variables. A simple example could look like this:
"Temperature": {{sensortab_value.0}}
In this case the web variable {{sensortab_value.0}} is replaced by the first sensor’s current value.
The following content would thus be sent to the cloud service, if the first sensor measures a temperature of 23.5°:
"Temperature": 23.5
The table on the side displays the most important web variables for sensors.
| Variable | Content |
| {{sensortab_name.0}} | First sensor’s name |
| {{sensortab_value.0}} | First sensor's value |
| {{sensortab_unit.0}} | Unit of first sensor's value |
| {{sensortab_name.1}} | Second sensor’s name |
| {{sensortab_value.1}} | Second sensor’s value |
| {{sensortab_unit.1}} | Unit of second sensor’s value |
Two additional input fields that can be used freely are available in the configuration section for HTTP-Push. They are commonly used to configure access keys or the like.
| Variable | Content |
| {{pushtab_var1}} | Content of the input field Variable 1 |
| {{pushtab_var2}} | Content of the input field Variable 2 |
An HTTP telegram fundamentally consists of two parts, the HTTP header and the HTTP content. Header and content are separated by a blank line.
Querx generates common HTTP headers automatically. However, most cloud services require specific headers in order to, for instance, specify the data format. Therefore, custom headers can be defined in the HTTP-Push templates. An additional header for data in the JSON format could read as follows:
Content-Type: application/json; charset=utf-8
Whenever a header is included in a template, the blank line that separates the header from the content is also required. The blank line is entered as follows:
{# #}
The complete template that is used to transfer the sensors’ values to the ThingSpeak cloud reads as follows:
Content-Type: application/json; charset=utf-8
{# #}
{
"{{sensortab_name.0}}": {"value": "{{sensortab_value.0}}", "unit":"{{sensortab_unit.0}}"},
"{{sensortab_name.1}}": {"value": "{{sensortab_value.1}}", "unit":"{{sensortab_unit.1}}"}
}
Before the file can be saved on the Querx sensor, a command line needs to be added to the template. This might read as follows:
add=/tpl/j/thingspeak.tpl
Such command lines are interpreted and subsequently deleted by the Querx uploader. The last command line is separated from the file’s main content by an additional blank line. Currently there are only two types of command lines. (Table on the right)
All templates for HTTP-Push are expected in the directory /tpl/j/.
| add=pathname | Saves the following content in a file in the specified directory |
| del=pathname | Deletes the file in the specified directory |
Saving Templates
After generating a template with a text editor, it need so to be transferred to the sensor’s memory. This is done in the section Install content on the Querx configuration page Maintenance/Firmware.
- Click the button Choose File in the section Install content. Select the file generated in the previous steps in the window that will open.
- Click Send, in order to transfer the file into the sensor’s memory.
Transmitting Data to ThingSpeak
A so-called API key needs to be included in the header, in order to transmit data to ThingSpeak. A complete template file that can be used for this purpose may thus read as follows:
add=/tpl/j/thingspeak.tpl

X-THINGSPEAKAPIKEY: {{pushtab_var1}}
Content-Type: application/x-www-form-urlencoded
{# #}
field1={{sensortab_value.0}}&field2={{sensortab_value.1}}
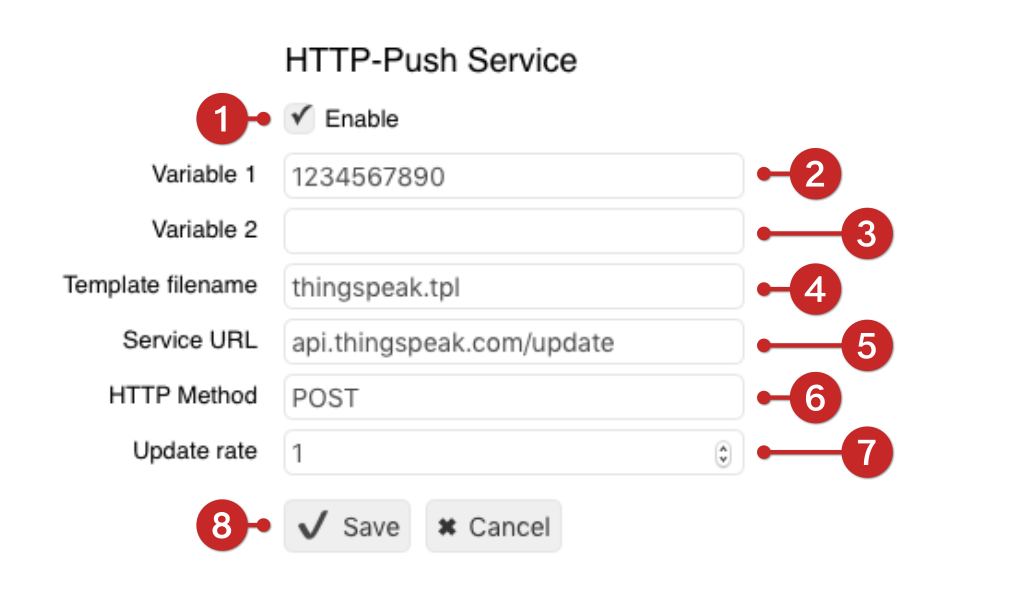
After generating the template file, it needs to be transferred to Querx, using the feature Install content in the configuration area, as detailed in the section Saving templates. Finally, HTTP-Push needs to be configured. Open the page HTTP-Push in the Querx configuration area.
- Click Enable in the section HTTP-Push Service.
- Enter the Write API key for your ThingSpeak channel into the input field Variable 1.
- Leave the input field Variable 2 blank.
- Enter the template file’s name into the input field Template filename.
- Enter the URL for your ThingSpeak channel into the input field Service URL.
- Enter POST into the input field HTTP Method.
- The Update rate needs to be specified (in minutes). If the value is set to zero, a dataset is transmitted whenever any data has changed.
- Click Save, in order to save your settings and begin transmitting data.
Entering the API key via a web variable during configuration replaces the placeholder {{pushtab_var1}} in the template file. This makes it possible to use a single template for numerous channels/sensors. If the key were entered into the template directly, each channel/sensor would require its own specific template.


