Tutorial: Querx and Nagios 4
This tutorial explains how to use Querx sensors in order to monitor the outdoor temperature and provides an example configuration. The tutorial is based on Nagios 4.2, running on Ubuntu 16.04 LTS.
Installing the Querx Plugin
Nagios can be expanded by installing so-called plugins. The plugin check_querx was written for the Querx sensors in the coding language Go. The source code is available from Github at https://github.com/egnite/querxnagios.
The executable version for 32- and 64-bit Linux can be downloaded from the egnite website
wget https://www.egnite.de/wp-content/uploads/2020/11/egnite-querx_nagios_plugin-1.3.tar.gz
and extracted using the command
tar -xzf egnite-querx_nagios_plugin-1.3.tar.gz
The plugin should now be copied into the Nagios plugin directory. The exact path for this directory is specified in the file
/usr/local/nagios/etc/resource.cfg
under the entry $USER1$, e.g.
$USER1$=/usr/local/nagios/libexec
The command to copy the 64-bit version is therefore
sudo cp linux-64-bit/check_querx /usr/local/nagios/libexec/
Testing the Querx Plugin
The plugin can be tested in the command line. Executing the plugin without any parameters
/usr/local/nagios/libexec/check_querx
will list all possible parameters:
Usage: check_querx [-hvV] [-c value] [-H value] [-P value] [-s value] [-w value] [parameters ...]
 -c, --critical=value
 -h, --help        Print help screen
 -H, --hostname=value
                   Hostname
 -P, --port=value  HTTP Port
 -s, --sensor=value
                   Sensor ID
 -v, --verbose     1
 -V, --version     Print version
 -w, --warning=value
Let us assume that a Querx is accessible on the network at the IP-address 192.168.192.192. This exemplary device’s sensor can be queried with the command
/usr/local/nagios/libexec/check_querx -H192.168.192.192 -c10:20 -s0
where the parameters stand for the following information:
| -H192.168.192.192 | Querx' IP-address |
| -c10:20 | Condition critical when measurement is below 10 or above 20 |
| -s0 | The first sensor is queried |
The returned output will be something like
CRITICAL: [qwth1:Temperature] 24.10 °C | Temperature=24.1;;;;
where the parameters stand for the following data:
| qwth1 | System name specified for Querx |
| Temperature | First sensor’s name |
| 24.10 °C | Temperature and unit of the first sensor’s current measurement |
Integrating the Querx Plugin into Nagios
Nagios uses a number of configuration files which define computers or hosts, services and commands. In principle it is not important which file defines which parameters. However, it does make sense to think about a sensible, ordered way of allocating the data.
The main configuration file is called nagios.cfg and usually found in the directory /usr/local/nagios/etc/. Along with other information, this file contains links to further files, such as
cfg_file=/usr/local/nagios/etc/objects/commands.cfg
cfg_file=/usr/local/nagios/etc/objects/templates.cfg
resource_file=/usr/local/nagios/etc/resource.cfg
We could now edit several of these files for Querx, in order to monitor the outdoor temperature.
Another option is defining all information pertaining to the configuration of Querx within one single configuration file. To this end we will need to create a new file called querx.cfg in the directory /usr/local/nagios/etc/objects/. The following commands are then entered into the new file:
###############################################################################
###############################################################################
#
# COMMAND DEFINITIONS
#
###############################################################################
###############################################################################

define command {
        command_name check_temperature
        command_line $USER1$/check_querx -H $HOSTADDRESS$ -s0 -w$ARG1$ -c$ARG2$
        }

define command {
        command_name check_humidity
        command_line $USER1$/check_querx -H $HOSTADDRESS$ -s1 -w$ARG1$ -c$ARG2$
        }

define command {
        command_name check_dewpoint
        command_line $USER1$/check_querx -H $HOSTADDRESS$ -s2 -w$ARG1$ -c$ARG2$
        }

define command {
        command_name check_pressure
        command_line $USER1$/check_querx -H $HOSTADDRESS$ -s3 -w$ARG1$ -c$ARG2$
        }
###############################################################################
###############################################################################
#
# TEMPLATES
#
###############################################################################
###############################################################################

define host {
        name                    querx-device
        use                     generic-host
        check_period            24x7
        check_interval          5
        retry_interval          1
        max_check_attempts      10
        check_command           check-host-alive
        notification_period     workhours
        notification_interval   120
        notification_options    d,u,r
        contact_groups          admins
        register                0
        }
This file is then added to nagios.cfg by entering the following line
cfg_file=/usr/local/nagios/etc/objects/querx.cfg
Configuring Querx Devices
Up until now, the file querx.cfg only contains general definitions, but a concrete sensor has not yet been specified. We could now add further entries that would let us, for instance, monitor the precise Querx that measures the outdoor temperature. A different possibility is allocating a separate file to each Querx.
The Nagios configuration’s main file contains the following entry:
cfg_dir=/usr/local/nagios/etc/servers
The keyword cfg_dir means that all configuration files in this directory are taken into consideration. This is advantageous to us since it lets us simply create a new file for each Querx without needing to make changes in any of the other files.
For a Querx that measures the outdoor temperature and is accessible at the IP-address 192.168.192.227, we will create a file called outdoorsensor.cfg in the directory mentioned above and enter the following commands into the newly created file:
###############################################################################
###############################################################################
#
# HOST DEFINITION
#
###############################################################################
###############################################################################

define host {
       use              querx-device
       host_name        outdoorsensor
       alias            outdoorsensor
       address          192.168.192.227
       }
###############################################################################
###############################################################################
#
# SERVICE DEFINITIONS
#
###############################################################################
###############################################################################

# Check outdoor temperature
define service {
        use                     generic-service
        service_description     Outdoor Temperature
        host                    outdoorsensor
        check_command           check_temperature!5\:25!0\:30
        }
This file configures the device itself, the host’s name and IP-address, as well as the service that is used to monitor the temperature.
Please take note of the additional backslashes that are required for the command check temperature. These are necessary because the Querx plugin expects the range limits to be separated by a colon, while Nagios itself interprets colons in a different, specific way. The backslash tells Nagios to treat the following character, i.e. the colon as an unchanged part of the command.
Activating Monitoring
sudo /usr/local/nagios/bin/nagios -v /usr/local/nagios/etc/nagios.cfg
lets us check if our configuration is accepted by Nagios. If no errors are reported, Nagios can be restarted with the updated configuration:
sudo systemctl restart nagios
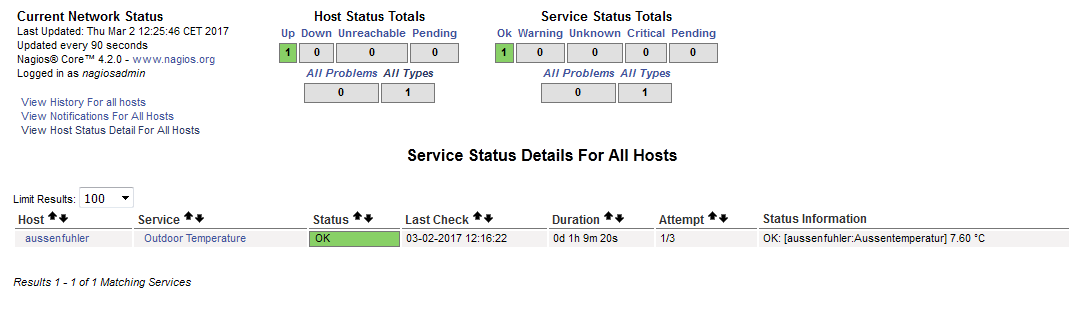
If we now open the Nagios web interface, the Querx outdoor sensor should appear under the menu point Services: