Tutorial: openSenseMap
opeopenSenseMap is an open web-platform that transfers sensor data and is available for free to anyone. This tutorial explains how to transfer current values from Querx to the platform. It also shows how to adapt Querx to new cloud services, independent from the selected platform.
Registering with openSenseMap
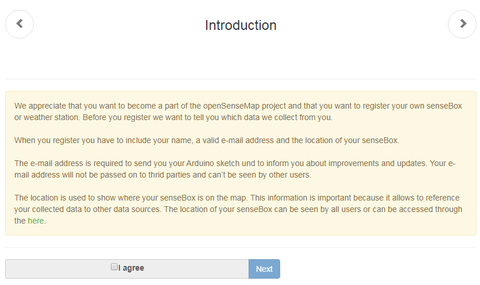
The first step is registering the device with openSenseMap. This requires a valid email address.

Activating the input field I agree confirms that the device’s location can be made public. The entered email address is only used to inform users of updates and is not passed on to third parties.
Now the device needs a name, e.g. Querx, and we need to select whether it is located indoors, outdoors, or is mobile.

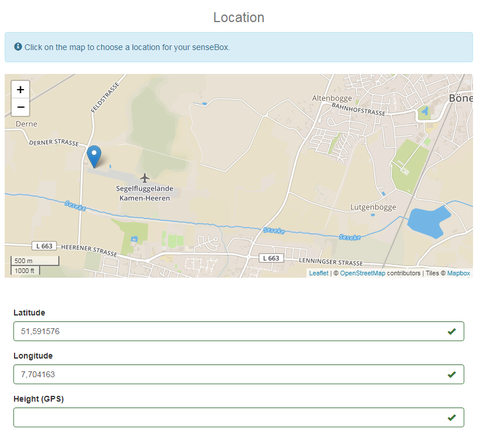
The next step is to enter the device’s location. This is done with the help of an intuitive roadmap.
Finally, the hardware setup needs to be specified. Since Querx is not supported natively, we need to select manual configuration. The sensor can be set up by clicking Add sensor.

On the next page you can confirm, that the data sent by the sensor can be used freely by anyone.
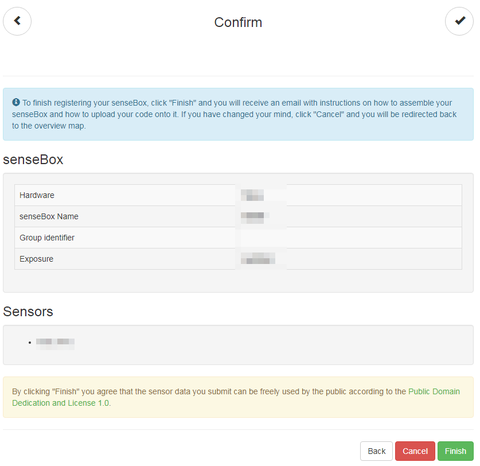
On the last page you are provided with a summary of the registered device, including an identificator for the device (senseBox ID) 1 along with another identificator for the sensor 2. Those will be needed later for the configuration of the Querx device.
Additionally, the source code for Arduino is displayed in a text box, though this is not needed for Querx. This code will be also sent as an attachment to the email address you provided.
Configuring Querx
Since the release of firmware version 4.2, it is now possible to configure the format for data export via custom template files. We are therefore no longer dependent on the firmware’s native support of particular cloud services, but can configure Querx to the requirements of any cloud available.
opsenSenseMap expects a JSON string in the following format:
{"value": measured value}
This string is sent to the following URL via POST. Here, ID1 and ID2 are the two identificators, we received during the registration:
ingress.opensensemap.org/boxes/ID1/ID2
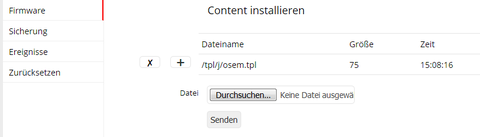
Now Querx needs a simple text file, a so-called template, with the following contents:
add=/tpl/j/osem.tpl

Content-Type: application/json
{# #}
{"value": {{sensortab_value.0}}}
This file with the name osem.tpl is created with a text editor (Notepad, vi, etc.) on our computer. The first line determines the folder in which the file is saved in Querx’s memory. The next line must remain blank. The following lines determine the contents of the data that is sent to the cloud and let us add further headers to the HTTP-POST. Here, we are only using one header (Content-Type) to determine the file format JSON.
In HTTP, headers are separated from the content by a blank line. The file will later be converted by the template interpreter within Querx, which deletes blank lines. A comment line, however, allows us to create a blank line. The comment {# #} is deleted by the interpreter, but the line itself remains. The final line contains the JSON string that is required by openSenseMap. The template interpreter replaces the part {{sensortab_value.0}} with the current value measured by the first sensor.
After having saved the file on our computer, we can now install it on Querx via the web interface, by navigating to the page Configuration / Maintenance / Firmware / Install Content.
Querx can now be set to send the sensor’s value to openSenseMap in regular intervals. Beginning with firmware version 6, we have improved cloud support. If you are still using an older firmware version, you will find according steps further below.
Switch to the configuration page Interfaces / Actions and choose HTTP-Push for Action type and time interval as Event type.

Click on Add to create the new action. Insert the following URL:
ingress.opensensemap.org/boxes/ID1/ID2
Replace ID1 by the identificator for the device (senseBox ID) and ID2 by the identificator for the sensor. Enter POST for the HTTP method and choose the template file, which was uploaded previously.
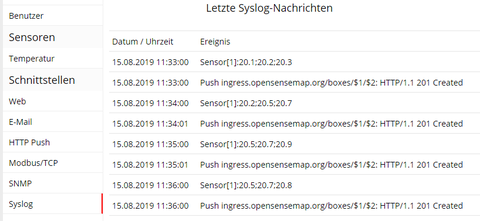
After providing the Update rate (in minutes) and activating the action by clicking Enable, the device will push the current sensor value regularly to openSenseMap in the specified time interval. If you don't want to wait, you can use the Button Test to trigger an immediate push. The result will be printed in the form of a Syslog entry on the bottom of the page.
If your Querx device still runs on firmware version 5, you can find the relevant configuration page under Interfaces / HTTP Push.
For devices using firmware version 4, the relevant configuration page can be found under Interfaces / HTTP Push, too.
Unfortunately, the length of the URL with the identifiers exceeds the limit of the input field of 63 characters for this firmware version.
We can solve this issue by entering the placeholders $1 and $2 in the URL and entering the identifiers in the variable fields.
When upgrading to firmware versions 5 or 6, you have to enter the identificators directly into the URL again, because those do not support placeholders anymore.
On Interfaces / Syslog you can monitor the communication with the cloud.
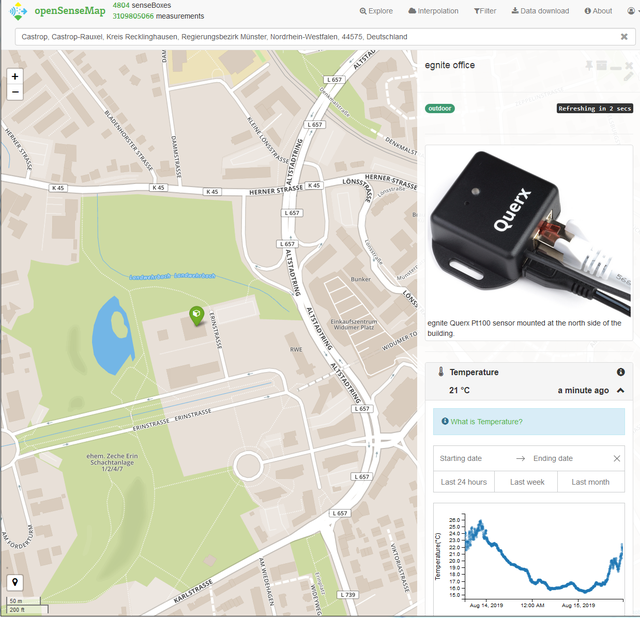
Result
If everything works as intended, we can now see the data in openSenseMap at
https://opensensemap.org/explore/ID1
The placeholder ID1 in the URL needs to be replaced by the device’s identifier.
This successfully demonstrates how to integrate Querx into new cloud services that are not supported by the device natively.
There are, however, several problems. For firmware version 4, we shortened the long URL by using variables and placeholders. Up to version 5 there was no means for the transfer of data by multiple sensors in one device. openSenseMap requires an individual URL for each sensor, while Querx can only configure one single URL. It was not until version 6 that sufficiently flexible configuration options were implemented.